The Baby Dipper Blog
Five Money Saving Tips for Families in 2014
There are plenty of ways for your family to work together to save money in the new year. A few easy methods involve using or making products you already keep in your house. Often, these methods to save money are healthier for you and your family, and easier on the environment. Making positive changes are great ways to teach your kids some valuable lessons. Here are five easy ways that your family can save money in 2014.
1. Make your own baby food
Baby food isn’t complicated or expensive to make. Instead of buying jars, save money by stocking up on fruits and vegetables (apples, bananas, peas, carrots, squash, etc.) and throwing them in the food processor or blender until they’re creamy smooth. Now you know exactly what’s in your little ones’ food and can be assured they’re eating the healthy stuff.
2. Use reusable cloth diapers
The cost of disposable diapers can quickly add up, and they pile up in landfills all over the world. You can save some money and help the environment by using reusable, washable cloth diapers. They’re comfy and especially useful if you have multiple kids who can share. It’ll cost you a bit more in washing expenses, but lots cheaper in the long run.
3. Shop at thrift or consignment stores
Your local thrift store is a great place to buy kids’ clothing, toys, books, school supplies, and home goods. It’s possible to find incredible deals at these stores - some items even still have the tags on! When your kids are little and going through apparel and toys quickly, buying new can be really expensive. Also, it’s good to donate your used goods back to the store when you’re done so someone else can enjoy them.
4. Utilize public transportation
If you’re lucky enough ti live in a part of the world that has public transportation and you aren’t using it, you’re crazy! Buses and trains are considerably less expensive than operating your own car and they give you an opportunity to relax or be productive on your ride. Walking or biking around is great for the body, too!
5. Make your own cleaning products
Avoid the harsh chemicals of store-bought cleaning products and make your own all-natural ones at home. For an all-purpose cleaner you can use baking soda or white vinegar mixed with warm water in a spray bottle. These eco-friendly cleaners are safe for the family, use basic ingredients you already own and they get the job done well.
 Written by Brabara Schantz or Baby Dipper Bowl
As a stay-at-home mom of 2 sets of twin babies, Barbara faced the daunting task of feeding them. Frustrated with the bowls she had already purchased, she researched and bought other bowls, but still remained disappointed. She needed a bowl that required only one hand to successfully feed a baby, but wasn’t able to find one on the market that satisfied this need. The vision for the Baby Dipper® bowl came to her when her twin girls were about 6 months old, not long after they started eating baby cereal and other pureed foods. After much learning and hard work, she was able to bring the Baby Dipper bowl to market so that others can enjoy true one-handed feeding.
For more information, visit babydipper.com.
Interested in writing a guest blog for Baby Dipper? Send your topic idea to [email protected].
All data and information provided on this site is for informational purposes only. Baby Dipper makes no representations as to accuracy, completeness, current-ness, suitability, or validity of any information on this site and will not be liable for any errors, omissions, or delays in this information or any losses, injuries, or damages arising from its display or use. All information is provided on an as-is basis.
Top 10 Teething Tips
Teething is a tough time for babies and toddlers and it’s tough on parents to watch their little ones fuss and cry from pain and discomfort. Teething toys can help due to their silicone textures that babies love to chew on. There are also several other homemade remedies you can try and tips you can follow to soothe your baby. Here are my top 10 teething tips all parents should know.
1. Rub baby’s gums
Teething babies gnaw on your fingers because they like the pressure against their gums. Rub your baby’s gums with a clean finger to put slight pressure on their gums which will feel good for baby.
2. Dry baby’s drool
Teething often causes babies to drool excessively which can irritate the skin, especially on baby’s chin. To prevent irritation, always keep a washcloth nearby to dry the drool.
3. Give baby a teether
Specially made teething toys can provide the perfect amount of resistance for baby.
4. Give baby a washcloth
You can soak a washcloth in water and apple juice and then give to baby to chew on. This is messier than using a teething toy but will work in a pinch.
5. Give baby frozen fruit
Place cold pieces of fruit in a mesh bag and give it to baby to chew on. You can also give baby a large frozen carrot or a frozen bagel. Just make sure it is not too hard or it can harm baby’s gums.
6. Clean baby’s mouth
Use a clean, damp washcloth to rub over baby’s gums which will keep bacteria from building up in baby’s mouth. When teeth begin to appear switch to using a small toothbrush with soft bristles.
7. Try cold baby food or yogurts
Babies that are teething may not want to eat. Try feeding them cold baby food or yogurts to help soothe the pain and fill their bellies.
8. Stick to the same sleep routine
Baby may start waking up during the night due to teething pain, but it’s important to stick to his usual sleep routine. If baby constantly cries for you and you go to check on him, he will begin to become dependent on you being there to fall asleep. If the sleep routine has already been disrupted, make sure you go back to it as soon as possible to reinforce it once again. The Family Sleep Institute can help with sleep training if any problems persist.
9. Keep an eye on teethers and pacifiers
Baby may be chewing more aggressively on teethers and pacifiers while teething so be sure to check them closely and look out for any broken or loose parts that can pose choking hazards. Inspect teething toys and pacifiers before every use for signs of wear and tear.
10. Check with your doctor
It’s common for baby to develop a low fever, runny nose or loose stools while teething, but you should still check with your doctor if your baby experiences these symptoms in case they are due to something more serious.
 Guest blog by Lori Bredemeier, Founder of Little Toader.
Lori Bredemeier is the co-founder of Little Toader with her husband Michael. They are the inventors of AppeTEETHERS, safe and effective teething toys for babies that look like real foods!
What makes AppeTEETHERS safe:
1. AppeTEETHERS are solid silicone and extremely durable. There are no parts and there are no surface materials that could possibly come apart or detached.
2. Lori and Michael are germ-a-phobes! This is another reason they chose silicone. AppeTEETHERS are not porous so they do not absorb germs, dirt, or any other undesirable deposits. This makes them very easy to clean at home or on the go.
3. AppeTEETHERS do not have topical paint. All of our coloring is the actual color of the silicone. There is no risk of flaking or having the paint rub off into your baby’s mouth.
Consistently ranking in the top teething toys, AppeTEETHERS are a truly unique teething solution. Babies love them and parents get a kick out of watching their precious bundle of joy using them. All Little Toader products are tested and are Consumer Product Safety Commission compliant.
Visit www.littletoader.com.
Interested in writing a guest blog for Baby Dipper? Send your topic idea to [email protected].
All data and information provided on this site is for informational purposes only. Baby Dipper makes no representations as to accuracy, completeness, current-ness, suitability, or validity of any information on this site and will not be liable for any errors, omissions, or delays in this information or any losses, injuries, or damages arising from its display or use. All information is provided on an as-is basis.
3 Cookies Recipes Santa Will Love
If you have little ones who are still excited about Santa Claus visiting their house on Christmas Eve, you’ll probably be leaving cookies and milk for him. Nice kids will leave him his treats to thank him for his generosity; the naughty ones will try one last bribe to get their presents.
Leaving cookies for Santa evolved from the German tradition of honoring Saint Nicholas. St. Nick was a German bishop who is remembered for being especially kind to children. Long ago, a feast would be held in his name, and children would leave food and drink out over night for him and his attendants. Since this tradition happens near Christmas, over time the two celebrations became associated.
Here are 3 great (and simple) cookie recipes for you to make with your kids. Use this as an opportunity to build excitement with your children and talk with them about the meaning of Christmas and the importance of giving.
You can turn a plain ole’ cookie into something special simply by cutting them into festive shapes. And everyone loves sugar!
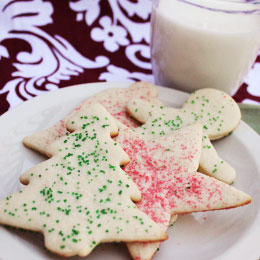
Ingredients:
- 2/3 cup butter - softened
- 3/4 cup granulated sugar
- 1 teaspoon vanilla extract
- 1 large egg
- 2 cups all-purpose flour
- 1 1/2 teaspoons baking powder
- 1/4 teaspoon salt
Instructions:
1. Heat oven to 375 degrees F.
2. Cream together butter and sugar until light.
3. Add vanilla and egg and stir until well combined.
4. Stir in flour, baking powder and salt until a soft dough forms.
5. Shape dough into a flat disc and wrap in waxed paper or plastic wrap and refrigerate at least one hour before rolling.
6. Dust rolling surface with an equal mixture of all-purpose flour and powdered sugar. Roll dough to 1/4-inch thickness and cut into desired shapes.
7. Place cut cookies onto a baking sheet prepared with cooking spray or covered with parchment paper.
8. Decorate with colored sugar or other decorations as desired.
9. Bake for 8-10 minutes or until very lightly golden.
10. Cool on baking sheet for 2 minutes before removing to racks to cool completely.
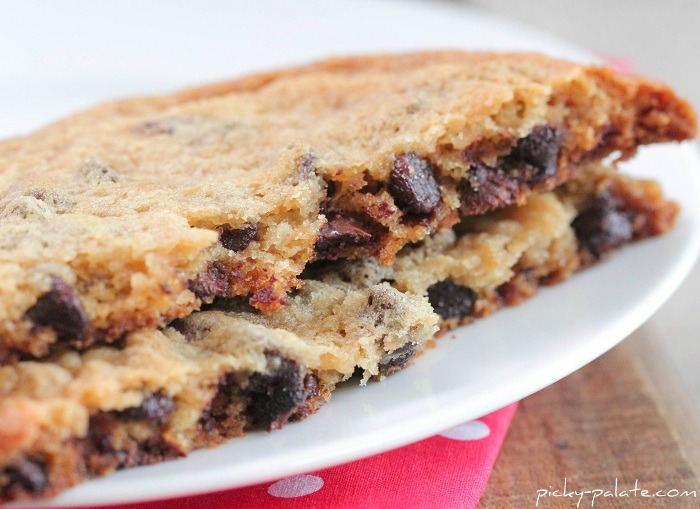
Buttery Chrisp XXL Chocolate Chip Cookies
Santa’s a big guy and he needs a big cookie. Not only are these giant, gooey, and buttery, but they’re super simple to make and require minimal clean up.
Ingredients:
- 2 Tablespoons unsalted butter, softened
- 2 tablespoons granulated sugar
- 2 tablespoons packed light brown sugar
- 2 tablespoons beaten egg
- 1/4 teaspoon pure vanilla extract
- 6 tablespoons all purpose flour
- 1/2 teaspoon baking soda
- 1/4 teaspoon kosher salt
- 1/4 cup chocolate chips
Instructions:
1. Preheat oven to 350 degrees F. and line a small baking sheet with parchment paper.
2. Place butter and sugars into a medium mixing bowl, beat with spoon until well combined. Add beaten egg and vanilla, mixing to combine. Add flour, baking soda and salt. Stir a couple times
3. add chocolate chips, stirring to combine. Scoop dough into the middle of your prepared baking sheet. Bake for 12-15 minutes, until baked through. Let cool for on baking sheet for 10 minutes before 4. removing.
5. Place on a plate for Santa Christmas Eve along with a glass of milk!
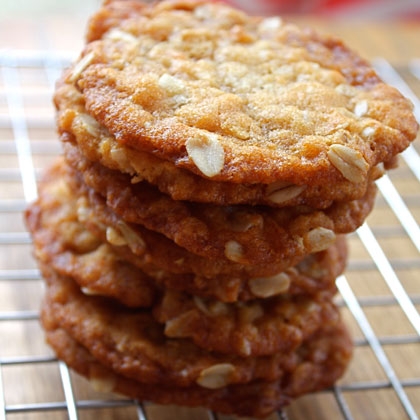
These oatmeal cookies are delicious and a bit different. Instead of raisin-y, they’re buttery, crisp, and chewy. Santa won’t be able to resist!
Ingredients:
- 1 cup rolled oats
- 1 cup flour
- 1 cup sugar
- 3/4 cup sweetened, flaked coconut
- 1 stick butter (I use salted)
- 2 tablespoons boiling water
- 1 tablespoon Lyle’s Golden Syrup (or light corn syrup)
- 1 teaspoon baking soda
- 1/2 teaspoon kosher salt (or half as much table salt)
Instructions:
1. Heat the oven to 300º F and prepare a large cookie sheet. Cover with parchment paper for even browning and easy clean-up, but you could grease it instead.
2. In a large bowl, stir together the oats, coconut, flour, sugar, and salt. Meanwhile melt the butter and syrup together in a small pot over low heat.
3. Stir the baking soda into the boiling water, then stir this into the butter and syrup and pour all of it over the dry ingredients. Stir well, then drop cookie-sized amounts onto the baking sheets, leaving plenty of space for them to spread.
4. Bake for 12-15 minutes, switching the pan around for even baking if needed, until the cookies are golden all over and quite brown on the edges (keep an eye on them — they can burn quickly); the cookies will look puffy when you remove them from the oven, and then they will sink and go a bit lacy. Leave them on the cookie sheet for 3 or 4 minutes before removing them with a spatula to cool on a rack; if you go at them too early, they will fall all to pieces.
 Guest blog by Lisa Paul Heydet of ZizzyBee Bags
At ZizzyBee, we believe children bring fun and whimsy to our lives…along with the need for organization of hundreds of teeny, tiny little toy parts. And like most moms, we believe it is important to keep organized while using products for our children that are safe, washable, well designed, and practical. With this in mind, full-time single mom and entrepreneur Lisa Paul Heydet, saw a need and created ZizzyBee Bags.™
ZizzyBee Bags eliminates the need for baskets and bins and makes toys portable and travel a snap. The attractive bags look good hanging from a hook or stacked in a diaper bag or suitcase. Keep children’s rooms organized by storing toys and clothes in ZizzyBee Bags. With two different sizes to choose from, you can use ZizzyBee Bags to keep items organized in desks, closets and more. They are easily packable and transportable for vacations, gym and work, road trips, school, grandparent’s house, playdates, strollers and so much more.
Interested in writing a guest blog for Baby Dipper? Send your topic idea to [email protected].
All data and information provided on this site is for informational purposes only. Baby Dipper makes no representations as to accuracy, completeness, current-ness, suitability, or validity of any information on this site and will not be liable for any errors, omissions, or delays in this information or any losses, injuries, or damages arising from its display or use. All information is provided on an as-is basis.
5 Simple Rules to Get Your Baby’s Sleep on Track
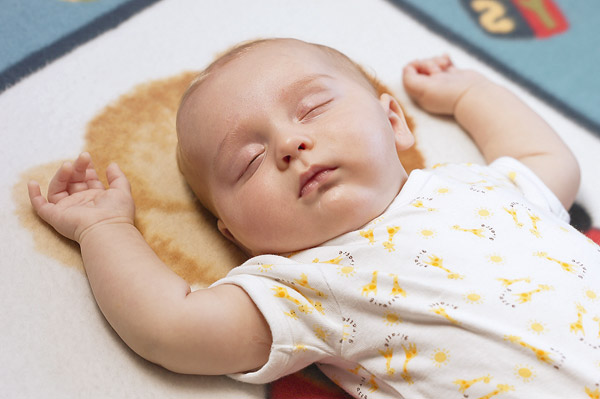 I became a child sleep consultant after having trouble getting my infant daughter to sleep. After researching for tips and advice and coming across conflicting information, I was still at a loss for what to do. After 9 months, I finally hired a sleep consultant and within two days my “terrible sleeper” was suddenly an incredible sleeper.
It turns out that all along she (like all babies) had this ability, we just had not taught her. So what’s the secret? I introduce the WRB Cheat Sheet, 5 Simple Rules to get your baby’s sleep on track.
Rule #1 — Your Baby Needs to Sleep in His Crib. Period.
Unfortunately, as I learned babies are not fashion accessories that we should just expect to fit into our social calendar. The sooner you can come to terms with this the better. Life would be much easier if we could tote our kids anywhere, at anytime and expect that they will get the sleep they need, but unfortunately that’s not the case. Babies and toddlers will achieve their very best sleep in their bassinet, crib, or bed, and it should be your goal for them to do the majority of their sleeping in this consistent location. Yes, very little babies have the amazing ability to sleep through anything, but once they reach about 2 months old they start to become social beings and have a much harder time blocking out what’s going on around them. Sleeping at home in their own darkened room will make sure there are no distractions. Also, babies and toddlers have better quality, more restorative sleep when they are sleeping in a stationary location like their own bed. Vibrations or motion during sleep (think strollers and car seats) force the brain into a lighter sleep state and reduce the restorative power of the nap. It’s similar in comparison to the sleep that you get on an airplane: ok, but not really restful. A nap on-the-go here and there is fine, but most naps should be taken in your child’s bed. This does make you a bit of a slave to your house but ask anyone who has kids — that first year flies by. Before you know it you will be out and about and personally, I would rather stay in and have a well-rested child than be out with a cranky, overtired baby.
Rule #2 — Your Baby Needs to Nap at the Correct Times
Naptime should follow your baby’s biological clock. We all have internal clocks called circadian rhythms that make us feel drowsy at certain times. It is easiest at these times to fall asleep and get our most restorative sleep. These times change as your child grows older. If you can base your child’s nap schedule so that they sleep in sync with these rhythms they will be able to achieve their best sleep. While it is sometimes daunting to follow a schedule, it will provide you the confidence to know exactly when your child will need to sleep and that he is getting the sleep that he needs.
Rule #3 — Insist on An Early Bedtime
Bedtime should be early enough to ensure that your child goes to bed before they become overtired. A child who is overtired has a harder time falling asleep and staying asleep. This is because when we get overtired we release the stress hormones cortisol, adrenaline and noradrenaline. This is a primitive fight or flight response, which is intended to keep us going. While this was probably helpful to cavemen, it is not when it kicks in for your baby and he gets a “second wind”. When this response occurs on a regular basis these hormones actually build up in your baby’s system and then cause him to wake-up in the middle of the night or early in the morning. Although it sounds counterintuitive, an early bedtime WILL NOT cause your child to wake earlier in the morning. In fact, early bedtimes help children to sleep later as they are better able to self soothe and consolidate sleep without the presence of these hormones. In short, an early bedtime allows babies to achieve longer stretches of better quality sleep. As an added bonus, it provides more time for you to unwind and have “you” time in the evening. What parent doesn’t need that?
Rule #4 — A Consistent Routine:
This one is so simple to achieve, yet so important! Babies and toddlers crave routine in their daily schedules as it helps them know what to expect. They follow patterns and your cues, so if you create a consistent soothing routine before sleep times then they will know to expect sleep to come next. Your soothing routine does not need to be anything complicated — maybe a book and a nice soothing song — but it needs to be consistent and should always end with your child going into bed sleepy, but awake.
Rule #5 — Teach Your Child to Fall Asleep
If your child relies on you to be with them until they are fast asleep, how will they know how to put themselves back to sleep when a sleep cycle ends during nap time or when they wake at night? Self-soothing is a skill that every child must learn to be an independent sleeper. Once your child is on the correct schedule and is falling asleep before he becomes overtired, self-soothing will come much more easily. There are lots of methods for teaching your child to self-soothe. Some methods involve more tears but work very quickly and some have little or no tears but take a bit longer. They all accomplish the same end goal — teaching your child to fall asleep on their own. This is one of the best skills you can teach a child as it enables them to become well rested, independent and better able to handle the opportunities and challenges each day presents.
Guest blog written by Amy Lage of Well Rested Baby
Amy Lage is a Family Sleep Institute certified Child Sleep Consultant. She is co-owner of Well Rested Baby. She offers a host of services including in person, phone, email and Skype/FaceTime consultations that can be tailored to meet any family’s needs and schedule. Amy is thrilled to be able to share her knowledge with other parents and hopefully transform their lives by helping them get a good night sleep!
Amy, her husband Jeff, their 2 and a half year old Stella, their 3 month old Harley, and their two dogs Jackson and Cody live in Beverly Farms, Massachusetts.
Please email her at [email protected] with any questions.
Interested in writing a guest blog for Baby Dipper? Send your topic idea to [email protected].
All data and information provided on this site is for informational purposes only. Baby Dipper makes no representations as to accuracy, completeness, current-ness, suitability, or validity of any information on this site and will not be liable for any errors, omissions, or delays in this information or any losses, injuries, or damages arising from its display or use. All information is provided on an as-is basis.
7 Ways to Deck out Baby’s Stroller
When traveling with your little one by stroller sometimes it gets uncomfortable for baby to sit there for so long, resulting in fussiness and restlessness. To ease baby’s discomfort and keep them entertained, always carry some toys and accessories for the stroller. Make your shopping trips or extracurricular activities a little easier by making sure baby or toddler has something to keep them occupied for long periods of time. Here are some of my favorite products to deck out your baby’s stroller.
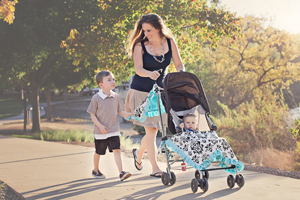
1. Babee Covee 6-in-1 Blanket
The Babee Covee is a convertible baby blanket and cover that has six uses in one! This mom made and award-winning must-have baby gear eliminates the need to buy, pack and carry bulky single purpose items while protecting baby/toddler from germs where ever you go; no more overflowing diaper bag’ no more blanket falling off the car seat and no more germs on publicly shared items!
The Babee Covee can be used as: 1) car seat canopy cover, 2) stroller cover/blanket, 3) shopping cart cover, 4) high chair cover, 5) nursing cover, and 6) playtime blanket.
$39.99 - $49.99
www.babeecovee.com
2. Baby Elephant Ears
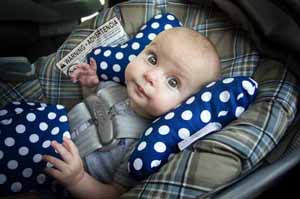
Baby Elephant Ears is a multi-use headrest providing spinal/neck alignment and comfort for babies — and they’re designed to look like adorable elephant ears! Baby Elephant Ears go wherever baby goes — stroller, swing, car seat, changing table, etc. The headrests are fully washable and require no attachments, straps or special skills and they’re offered in diverse prints and organics. The superior design and durability of these headrests make them the perfect gift for parents! Winner of this year’s Huggies Mom-Inspired Award!
$21.95
www.babyelephantears.com
3. Zipadee-Zip
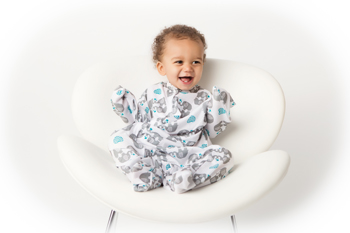
The Zipadee-Zip is the best solution for transitioning baby from swaddling. It provides babies with the snug feeling of security while allowing for the freedom of pajamas. With Zipadee-Zip, babies are free to stand up, crawl, roll and move around safely. This versatile sleep garment has 7+ uses including: encourages sleep during travel, provides a germ-free environment on planes, trains and cars, prevents scratching and more. It works like magic to help babies fall asleep and stay asleep and is ideal for transitioning babies from swaddling or for babies who do not like to be swaddled.
$34.95
4. Little Toader AppeTEETHERS
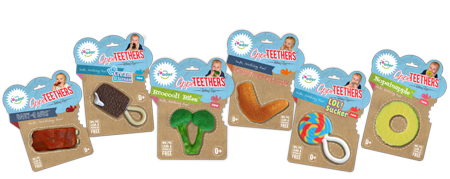
Teething is one of the most painful development processes for babies and is just as tough on parents. AppeTEETHERS are patented silicone teething toys free of BPA, Phthalate, PVC, and lead. They provide the perfect amount of resistance to sooth babies’ sore gums, and best of all the cute one-of-a-kind designs will surely make you chuckle because they look exactly like real food! The current line includes Chompin’ Chicken Wing, Baby-Q Rib, Ice Cream U Scream, Nopainapple, LOL! Sucker and Broccoli Bites.
$9.99
www.littletoader.com
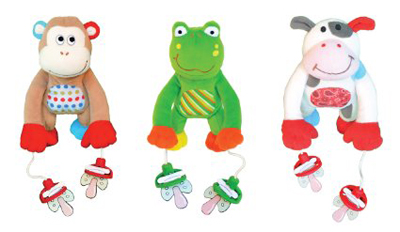
5. PullyPalz
Pully Palz are the first ever baby toys that actually help babies retrieve their own pacifiers! They’re interactive and entertaining to keep baby distracted and helpful for parents who no longer have to play the “pacifier game.” The innovative and developmentally beneficial toy keeps pacifiers in view and in reach to keep them clean. Pully Palz hold most pacifiers and attach to baby carriers, bouncers and more.
$19.99
www.pullypalz.com
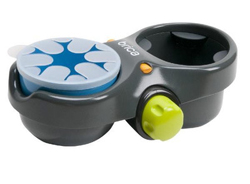
6. Brica(R) Deluxe Snack Pod
When you’re off and running, snacks can mean the difference between a happy child and total meltdown. Keep juice, crackers, or cereal in reach, off the floor, and out of the seat cushions with this spill-resistant snack and drink holder. The Quick-Attach(TM) clamp fits most stroller frames, car seats, and shopping carts in seconds and clean-up is as easy as popping it in the dishwasher. Everyone is just happier when you can add a little comfort to your outing.
$14.99
www.brica.com
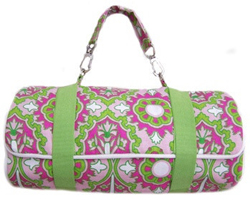
7. Buti-Bag
The Bundle is an incredibly versatile and truly adorable bag that you’ll use for years to come. Perfect for the active lifestyle of every mom, the bundle is not only great for keeping your diapering essentials within reach, but remains useful well after your child is grown. The bundle is a perfect for first aid kits, cosmetics, toiletries, small trips and much more.
$59.00
www.butibag.com
 Written By Alma Moussa, Inventor of Babee Covee.
Invented by accident by Alma Moussa during a playdate, the Babee Covee is a versatile baby blanket and cover that has six uses in one! This award-winning, must-have baby gear eliminates the need to buy, pack, and carry bulky single purpose items while protecting baby from germs where ever you go; no more overflowing diaper bag’ no more blanket falling off the car seat and no more germs on publicly shared items!
The Babee Covee can be used as: 1) car seat canopy cover 2) stroller cover/blanket 3) shopping cart cover 4) high chair cover 5) nursing cover and 6) playtime blanket. It easily attaches to a car seat or stroller and does not fall off! It can also be used to cover the baby for privacy while sleeping (includes a peek in window).
Interested in writing a guest blog for Baby Dipper? Send your topic idea to [email protected].
All data and information provided on this site is for informational purposes only. Baby Dipper makes no representations as to accuracy, completeness, current-ness, suitability, or validity of any information on this site and will not be liable for any errors, omissions, or delays in this information or any losses, injuries, or damages arising from its display or use. All information is provided on an as-is basis.
6 Sleep Tips for Easier Traveling with Children Over the Holidays
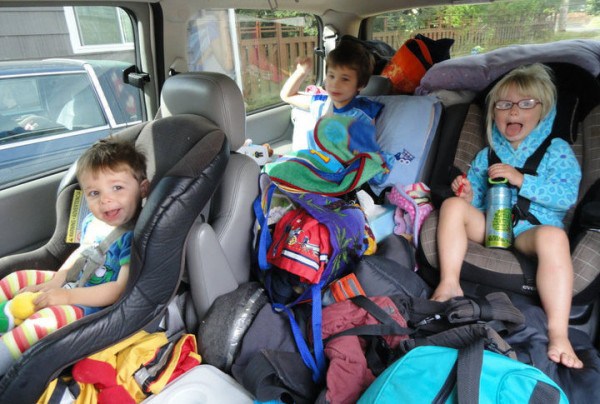 With the holiday season quickly approaching, many parents are wondering how to fit their holiday travel plans around their child’s sleep schedule. In my work with children and families as a certified sleep consultant, I’ve learned how to help families get through the holidays. Here are 6 tips to help your children sleep well while traveling this holiday season.
1. Establish healthy sleep habits before you leave
A well-rested child will adapt to changes in their routine and schedule better than an overtired child, so make sure they are caught up on sleep before you go. It’s also important to have a consistent sleep routine in place so that you can re-create their nap and bedtime routine when traveling. This will be comforting to your child as they will recognize the sleep cues even in a strange place.
2. Do some planning ahead of time
If you don’t normally share a room with your child, try not to share a room while you are traveling. Book a hotel suite instead of a single room, hang a sheet as a room divider, or use a walk-in closet as a temporary nursery. If you child is unable to see you, it will make the transition easier and they won’t be looking for middle of the night stimulation. If you plan on using a travel crib or playpen over the holidays, allow your child to practice sleeping in it before you go.
3. Bring along their sleep environment and favorite items
Bring your child’s sheets, blankets and sleep sack with you if possible. Their familiar smell and feel will help calm your child in a strange environment. If your child is used to falling asleep to white noise, bring that along as well to help soothe them and drown out any unfamiliar noises. Also don’t forget to bring your child’s favorite lovey, pacifier or stuffed toy as these items are invaluable when traveling away from home.
4. Preserve sleep schedules as much as possible
Where possible, make your travel and holiday plans around your child’s normal sleep schedule. Make it possible for your child to nap when they usually nap, and maintain your usual nap time and bedtime routine. If you follow your usual schedule and routine, your children are less likely to lose sleep and become cranky and overtired.
5. Help them adjust to changing time zones
If you are traveling to a different time zone for more than a few days, get your child’s schedule on the new time as quickly as possible. Have your child go to bed at their usual bedtime and be sure to wake up your child in the morning when they would normally wake up. It also helps to expose your children to plenty of natural light to reset their internal clock.
6. Have a plan of action for your return home
If there were many changes to your child’s sleep environment, schedule and sleep habits while away, your child’s sleep may be a little “off” upon your return home. Have a plan to get your child back on their usual schedule and routine the minute you walk through your front door. If your child missed some sleep over the holidays, plan for an earlier bedtime to help them catch up on sleep. The sooner you get them well-rested and back to their regular routine, the sooner your child will adjust to being back home.
 Guest blog by Jenn Kelner from BabyZzz
Jenn Kelner is a Family Sleep Institute Certified Child Sleep Consultant and owner of BabyZzz. She helps tired families with infants, babies and toddlers become well rested families through customized sleep solutions and support. She offers various services including home, phone/Skype and email consultations.
For more information visit www.babyzzz.ca or email [email protected].
Interested in writing a guest blog for Baby Dipper? Send your topic idea to [email protected].
All data and information provided on this site is for informational purposes only. Baby Dipper makes no representations as to accuracy, completeness, current-ness, suitability, or validity of any information on this site and will not be liable for any errors, omissions, or delays in this information or any losses, injuries, or damages arising from its display or use. All information is provided on an as-is basis.
Car Seat Safety Tips for Parents Traveling With Small Children
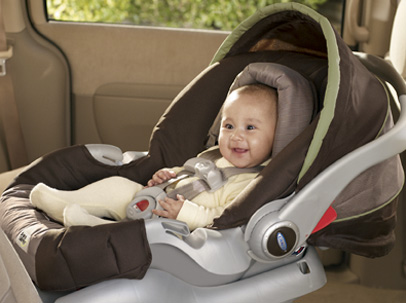 When it comes to traveling by car with little ones, parents want to be prepared to make the trip as safe as possible. It’s not always easy to know what to do to protect your children, which is why you can find different resources online to help guide parents on how to keep kids safe in and around vehicles. As a mom of four and as a certified car seat safety instructor, I encourage parents to do their research on vehicle safety. Below are four tips for choosing the right car seat.
One of my favorite sites to help parents find the right car seat for their situation is Healthy Children, which is from the American Academy of Pediatrics. They have a list of car seats on the market each year that gives the sizes and prices of each car seat.
Parents should remember that four things need to be true for a car seat to be the right one for them:
1. The car seat must fit your child.
You should choose your car seat based on your child’s age and size. As children grow they may no longer fit in the same seat. Check the manual for your car seat to determine the maximum weight and height allowed by the manufacturer.
2. The car seat must fit your car.
Car seats are not designed to fit every vehicle. To make sure it’s the right fit for your vehicle you should test the car seat that you are planning to buy and also read the car seat section of your vehicle’s owner’s manual for more information.
3. The car seat should fit your budget.
Car seats can be expensive but just because it costs more does not mean it’s a better choice. Making sure that it’s the right fit for your child and vehicle are the better criteria to go by. Choose the car seat that best suits your needs. Keep in mind you should never purchase a used car seat without knowing the history of the seat and checking to see if it has been recalled. If you have any questions about the seat, call the car seat manufacturer.
4. Most importantly, you need to use the car seat correctly EVERY time.
You have to make sure that your car seat is facing the right direction according to your child’s age. Infants and toddlers under age 2 should ride in rear-facing car seats. It’s also important that you use harness straps and chest clips correctly so they fit snugly across your child’s body. Always follow the instructions from the car seat manufacturer to ensure that you are following all of the guidelines.
Just because a seat is fancy or a brand name doesn’t mean it is the right one. Every car seat on the market meets all of the U.S. standards for car seat safety. Cup holders, colorful decorations, or licensed characters do not help at all with safety.
For more information on car safety for kids visit www.safekids.org and www.safercar.gov.
Find a car seat inspection station near you at http://www.nhtsa.gov/apps/cps/index.htm. A certified technician will inspect your car seat and show you the correct way to install it.
Written by Brabara Schantz or Baby Dipper Bowl
As a stay-at-home mom of 2 sets of twin babies, Barbara faced the daunting task of feeding them. Frustrated with the bowls she had already purchased, she researched and bought other bowls, but still remained disappointed. She needed a bowl that required only one hand to successfully feed a baby, but wasn’t able to find one on the market that satisfied this need. The vision for the Baby Dipper® bowl came to her when her twin girls were about 6 months old, not long after they started eating baby cereal and other pureed foods. After much learning and hard work, she was able to bring the Baby Dipper bowl to market so that others can enjoy true one-handed feeding.
For more information, visit babydipper.com.
Interested in writing a guest blog for Baby Dipper? Send your topic idea to [email protected].
All data and information provided on this site is for informational purposes only. Baby Dipper makes no representations as to accuracy, completeness, current-ness, suitability, or validity of any information on this site and will not be liable for any errors, omissions, or delays in this information or any losses, injuries, or damages arising from its display or use. All information is provided on an as-is basis.